How to Create Video With AI for Cinematic Results
Creating video with AI is all about using specialized software to turn your text prompts or still images into moving video clips. With platforms like Auralume AI, it’s as simple as typing a description or uploading a picture. An AI model then gets to work and generates a short, cinematic video from your input, often in just a few seconds.
The New Reality of Cinematic AI Video
Welcome to a completely new era of filmmaking. This is a world where your words and images can literally transform into stunning, cinematic video right before your eyes. This guide is here to pull back the curtain on AI video generation and show you how accessible tools are putting professional-grade production within reach for everyone, not just big-budget studios.
The days of needing a truckload of expensive gear and years of technical training to make a high-quality video are quickly becoming a thing of the past. We're going to dive into the real-world impact of text-to-video and image-to-video technologies and see how creators, marketers, and artists are bringing complex ideas to life in minutes—a process that used to take weeks.
A Game-Changing Skill for Modern Creators
Learning how to create video with AI isn't just a niche hobby anymore; it's a massive advantage for anyone working online. The power to quickly visualize a concept, spin up an ad, or animate a piece of art is incredible.
And this isn't just a fleeting trend. It's a fundamental market shift. The global AI video market was valued at USD 11.2 billion in 2024 and is on a trajectory to hit an eye-watering USD 246.03 billion by 2034. This explosion is fueled by the relentless demand for fast, high-quality video content that platforms like Auralume AI are built to deliver, especially by integrating powerful models like Google Veo and Kling.
This technology puts the power of a film studio into the hands of anyone with an idea. It allows for rapid prototyping and creative exploration without the traditional barriers of cost and complexity, essentially democratizing video creation.
Whether you're a YouTuber who needs a killer intro, a marketer crafting a social media campaign, or a filmmaker storyboarding a scene, these tools offer a direct path from concept to a finished product.
- For Marketers: You can generate product videos or social ads in seconds, A/B test different visual concepts on the fly, and create engaging content without ever hiring a production crew.
- For Creators: Animate your digital art, create dynamic B-roll for your vlogs, or visualize complex narratives for your next short film.
- For Businesses: Quickly develop internal training materials or corporate communications that are visually engaging and dead simple to produce.
Of course, even though AI handles the heavy lifting, knowing the basics of video production is still a huge help. For some great foundational knowledge that can inform your AI work, this comprehensive guide to creating product videos offers some really valuable advice. This guide will build on those principles, showing you how to apply them within a modern, AI-first workflow.
Picking Your AI Model and Writing Better Prompts
The final look and feel of your AI video really comes down to two things: the AI model you pick and the prompt you write. Think of it like this: you're casting the right actor and then handing them the perfect script. Getting both of these right is what separates a decent clip from something genuinely breathtaking.
Your first move is always choosing the right engine for the job. Not all AI models are built the same; each has its own personality and strengths, just like a photographer uses different lenses for different shots. To get a feel for what's out there, it's a good idea to check out a breakdown of the best AI video generators to understand the current landscape.
The great thing about platforms like Auralume AI is that they bring several top-tier models together under one roof. This lets you experiment freely without having to juggle a bunch of different accounts and subscriptions.
Matching the AI Model to Your Project
Choosing an AI model is all about matching its specialty to what you're trying to create. Are you just trying to add a little motion to a static photo, or are you generating a complex, epic scene from scratch? The answer will point you to the right tool.
- For Hyper-Realism (Text-to-Video): Models like Google Veo and OpenAI's Sora are masters of creating incredibly lifelike scenes. They have a deep understanding of physics, light, and texture, making them the go-to choice for cinematic shots that need to feel real.
- For Stylized Animation (Text-to-Video): If you're going for a more artistic or imaginative look, engines like Pika and Kling are fantastic. They can produce vibrant, surreal visuals perfect for animated shorts, music videos, or abstract storytelling.
- For Bringing Images to Life (Image-to-Video): Some models are specifically designed to take a still image and add subtle, natural motion. This is the perfect technique for animating a product shot, a piece of digital art, or even a portrait to give it a little spark.
So, how do you pick the right one? Here's a quick comparison to help you decide.
Comparing AI Video Model Strengths
This table breaks down some of the leading AI video models to help you pick the right tool for your project, whether you're animating photos or generating entire scenes from text.
| AI Model | Primary Strength | Best For (Use Case) | Example Scenario |
|---|---|---|---|
| Sora (OpenAI) | Unmatched realism & physics | Creating complex, cinematic scenes | A multi-shot sequence of a woolly mammoth walking through a snowy landscape. |
| Google Veo | High-fidelity, long-form video | Brand commercials, short films | Generating a seamless 60-second ad with consistent characters and environment. |
| Pika | Stylized & creative animation | Music videos, social media content | Turning a simple drawing into a vibrant, looping animated GIF. |
| Kling | High-quality, artistic visuals | Abstract storytelling, visual effects | Creating a dreamlike sequence where a city skyline melts like watercolor. |
Ultimately, having access to multiple models on a platform like Auralume AI is a game-changer. It lets you run the exact same prompt through different "directors" to see which one truly gets your vision.
The interface is designed for exactly this kind of experimentation.
This simple dropdown lets you switch between models on the fly, making it dead simple to compare how each one interprets your creative brief.
The Art of the Cinematic Prompt
Once your model is selected, the prompt is everything. A lazy, vague instruction will always give you a generic, uninspired result. A detailed, cinematic prompt is what unlocks the AI's real magic. You have to go beyond just describing what you want to see and start directing the entire scene.
A weak prompt sounds like this: a dog running in a field
A strong, cinematic prompt gives the AI so much more to work with:
A golden retriever joyfully bounding through a field of tall, golden wheat at sunset. The camera is low to the ground, tracking alongside the dog in slow motion. Warm, cinematic lighting, lens flare, shot on 35mm film, 4K resolution.
See the difference? We've given the AI specific instructions on the subject, action, environment, camera work, lighting, and even the final aesthetic.
Advanced Prompting Techniques: Thinking Like a Filmmaker
To really level up your results, you need to start thinking like a director of photography. Sprinkling in some specific filmmaking terminology will guide the AI's virtual camera and lighting crew.
Here are the key elements your prompts should include for truly cinematic results:
- Shot Type: Is this a close-up, a medium shot, or a sweeping wide establishing shot? Be specific.
- Camera Angle: Tell the AI if you want a low-angle shot to make a subject look powerful, a high-angle shot, or a simple eye-level perspective.
- Camera Movement: Use classic terms like dolly zoom, tracking shot, slow pan, or even a handheld static shot to add a human touch.
- Lighting: Set the mood with descriptions like dramatic Rembrandt lighting, soft morning light, or a neon-drenched cyberpunk glow.
- Aesthetic & Style: Call out the specific vibe you're after. Mention things like cinematic 4K, shot on 35mm film, vaporwave aesthetic, or Pixar style animation.
This can feel like a lot to remember, which is why tools like Auralume AI’s integrated Prompt Wizard are so helpful. It takes your basic idea and then intelligently suggests adding these kinds of cinematic details. It’s like having a little film school coach right there with you, making advanced prompt writing accessible to anyone.
Generating and Refining Your AI Video Clips
Alright, you’ve picked your model and have a solid prompt ready to go. Now for the fun part: actually making the thing. This is where the magic happens, moving from abstract ideas to tangible video clips you can see and tweak. It's a hands-on cycle of creating, reviewing, and refining until what you see on screen matches the vision in your head.
The whole field is moving at an incredible pace, and the tools are getting much easier to use. The AI video generator market was valued at USD 614.8 million in 2024 and is projected to hit USD 2,562.9 million by 2032. That's not just hype; it's driven by real demand. For example, large companies spent USD 318.7 million on these tools just last year to speed up content creation. This is why integrated platforms like Auralume AI, which pull different models like Seedream and Vidu into a single workflow, are becoming so popular. You can read more about the AI video market's growth and what's driving it if you're curious.
Your first move depends entirely on what you’re trying to achieve. Are you bringing an existing image to life, or are you creating a whole new scene from scratch using only words? That one decision shapes your entire starting process.
This little decision tree can help you visualize the two main paths you can take.
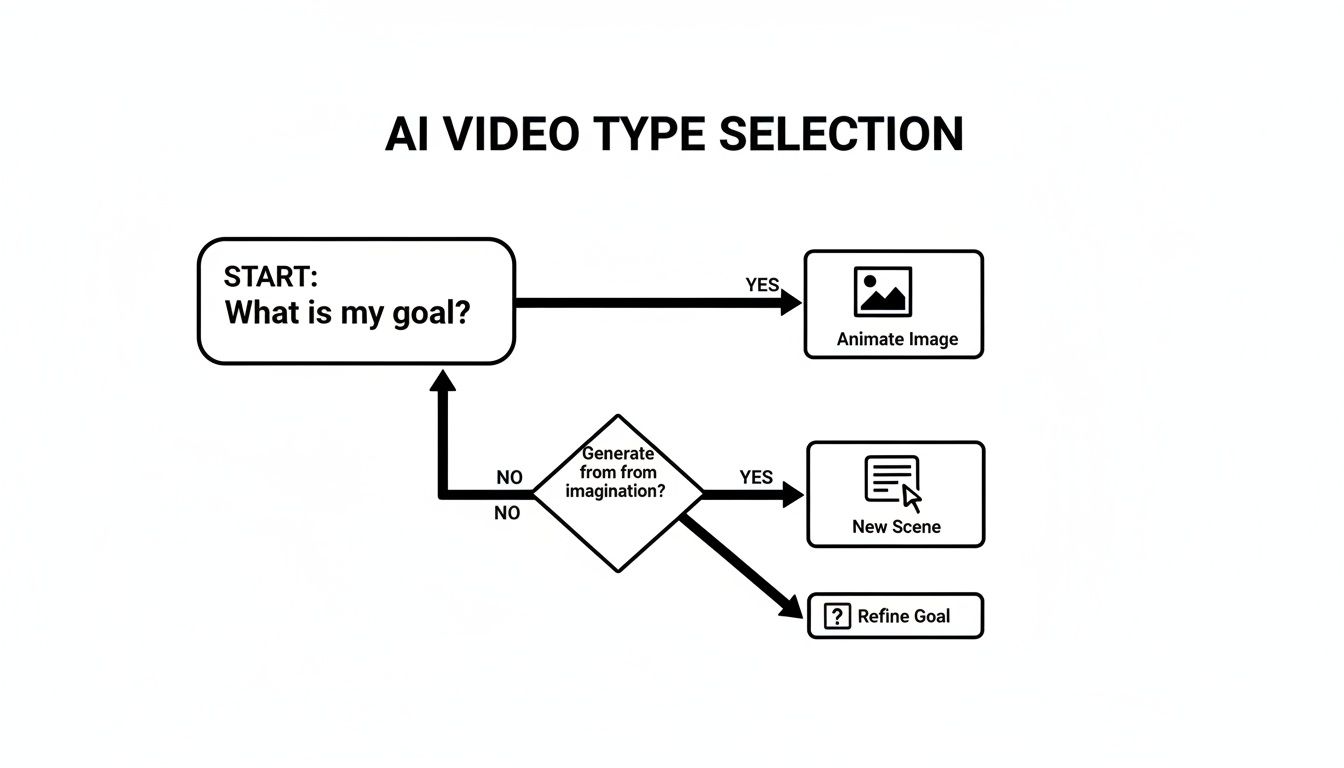
As the chart shows, it really boils down to your objective. Start with a prompt for a new scene, or upload an image to animate what's already there.
The Iterative Generation Loop
Let's be real: your first generated clip will almost never be the final one. Think of it as the first take on a film set. You look at it, see what works and what doesn't, and then give the AI some new direction for the next take. This back-and-forth is the core of the creative process here.
Don't hesitate to generate three, five, or even ten variations of the same idea. Each attempt gives you clues. Maybe the lighting in one is almost perfect, but the camera movement in another is much better. This is where you start mixing and matching ideas in your prompts to get the best of both worlds.
The secret to amazing AI video isn't getting it right on the first shot. It's about getting comfortable with rapid iteration. Generate, look at it, tweak your prompt, and go again. Every cycle gets you a step closer to something truly cinematic.
For instance, say your first prompt, "a futuristic city at night," gives you a scene that's way too bright and clean. Your next attempt might be, "a dark, futuristic city at night, illuminated only by neon signs, moody atmosphere."
Refining Your Output with Smart Adjustments
Tiny changes to your prompt or settings can have a huge impact. Once you have a base clip that you’re happy with, it’s time to make small, precise adjustments to really nail the details.
Here are a few tactics I use all the time:
- Adjusting Motion Control: Most generators let you control the amount of motion. If a scene feels too frantic, try dialing down the motion intensity for a slower, more subtle effect.
- Swapping AI Models: Take your best prompt and just run it through a different model. A prompt that looks photorealistic in Google Veo might create a beautiful, painterly animation in Pika. It costs nothing but a few seconds and can lead to happy accidents.
- Using Negative Prompts: This is a big one. Tell the AI what you don't want. If you keep getting blurry faces or weird, distorted hands, adding a negative prompt like
(--no blurry faces, distorted hands)can instantly clean up your results.
This isn’t about starting over from scratch each time. It's about gently guiding the AI toward your vision with each small refinement. It’s a true collaboration.
Upscaling for Professional Quality
Most AI models generate video at a lower resolution to keep things fast. The output might look fine on your phone, but it will probably look soft and pixelated on a larger monitor or TV screen.
This is why upscaling is a non-negotiable final step.
Upscaling tools use a separate AI algorithm to intelligently increase your video's resolution. They don’t just stretch the pixels; they add new detail and sharpness, transforming a standard-def clip into something crisp and ready for a professional project. An integrated tool, like the Video Upscaler within Auralume AI, makes this ridiculously easy.
Instead of downloading a low-res file only to upload it to another website, you can just send your best clip to the upscaler with a single click. The result is a polished 2K or 4K video that’s ready for the editing timeline. Honestly, skipping this step is one of the biggest rookie mistakes I see.
Assembling Your Clips Into a Final Cut
You’ve done it. You have a folder brimming with stunning, AI-generated clips. But a pile of great shots isn't a story. The real magic happens in the edit, where you weave those individual moments into a single, cohesive narrative that actually makes people feel something.
This is where you go from a tech demo to a finished piece. The principles of good editing—pacing, rhythm, and flow—are just as vital when you create video with AI as they are in traditional filmmaking. Whether you're cutting a quick social ad or an artistic short film, your job is to guide the viewer’s eye and emotions from one frame to the next.
Building Your Narrative Sequence
Before dragging anything into a timeline, take a step back and think about the story. Even a 15-second video needs a beginning, a middle, and an end. Laying out your clips isn't about just putting them in a row; it's a deliberate act of building a visual journey.
I always start by organizing my clips into bins—maybe "establishing shots," "action moments," and "closing scenes." It's a simple step, but it gives me a bird's-eye view of my raw materials, making it so much easier to start building.
Your timeline is your canvas. Don't just place clips next to each other; think about how each shot sets up the next. A fast-paced action clip followed by a slow, lingering shot creates a powerful emotional shift.
For a product ad, you might open with a wide, attention-grabbing scene, cut to close-ups on key features, and then finish with a clear call to action. For something more narrative, you’d establish the setting, introduce conflict, and then bring it to a resolution. Same principle, different application.
Mastering the Fundamentals of Editing
With a rough sequence in place, it’s time to get your hands dirty. This is all about trimming the fat, getting the timing right, and using transitions to create a seamless experience. You don't need a crazy expensive software suite for this; plenty of powerful and even free editors can handle the job.
- Trimming for Impact: Most AI clips are short, but the most powerful moment might only last a second or two. Be ruthless. Trim the start and end of every clip to keep only the absolute best part of the action. This keeps the pace snappy and your audience hooked.
- Pacing and Rhythm: The length of each shot creates the heartbeat of your video. A quick succession of short clips feels energetic and exciting—perfect for a high-energy ad. Longer, slower shots give the viewer time to breathe and are great for more dramatic or emotional beats.
- Transitions: Honestly, the simple jump cut is your best friend 90% of the time. But sometimes, a subtle cross-dissolve can help smooth the flow between two visually jarring scenes. Just avoid those cheesy, over-the-top transitions unless they serve a very specific stylistic purpose.
The Critical Role of Sound Design
Let's be real: audio is at least 50% of the video experience. A silent video feels dead on arrival. The right sound, on the other hand, can completely transform the mood and make your visuals ten times more powerful.
I think of audio in three distinct layers:
- Music: The score sets the entire emotional tone. Is it upbeat and inspiring, or dark and mysterious? Find a track that matches the vibe you're after. Platforms like Epidemic Sound or Artlist are my go-to for incredible royalty-free options.
- Sound Effects (SFX): These are the tiny details that sell the reality of the scene. The whoosh of a camera pan, the rustle of leaves, the subtle click of a button—these small sounds add an immersive layer of detail that most people won't consciously notice but will absolutely feel.
- Voiceover: If your video needs narration to guide the story, a clean recording is non-negotiable. You don't need a professional studio; a decent USB microphone and a quiet room can get you surprisingly professional results.
Exporting for Maximum Quality
You’ve made it to the finish line. The final step is exporting your project, and your settings here are crucial. Each platform has its own "preferred" specs, and delivering a file that's optimized for that platform makes a world of difference in how it looks.
Here's a quick cheat sheet I keep handy:
| Platform | Recommended Resolution | Aspect Ratio | Format |
|---|---|---|---|
| Instagram Reels / TikTok | 1080 x 1920 pixels | 9:16 | MP4 |
| YouTube | 1920 x 1080 (1080p) or 3840 x 2160 (4K) | 16:9 | MP4 |
| LinkedIn / X (Twitter) | 1920 x 1080 pixels | 16:9 | MP4 |
Always export at the highest quality the platform will happily accept. A sharp, well-edited video with crisp audio and the right technical specs will always perform better and ensure all your hard work truly shines.
Smarter Workflows and Ethical AI Use for Creators
Bringing AI into your creative process is about so much more than just making clips. It's a fundamental shift in how you approach your work, and with that power comes a new set of practical and ethical questions every creator and marketer needs to think about. If you want to use these tools professionally and build a sustainable workflow, you have to get this part right.
Learning how to create video with AI isn’t just a technical skill; it’s a strategic one. For me, the biggest win has been in rapid prototyping. Before, a new concept meant a potentially costly and time-consuming live-action shoot. Now, I can spin up a dozen different visual ideas in a single afternoon.
This approach lets you experiment with different moods, color palettes, and story arcs without much risk. You can figure out what really connects with your audience before you pour serious resources into a full-blown production.
Choosing the Right Pricing Model
Once AI becomes a regular part of your toolkit, you'll need to figure out the best way to pay for it. Most platforms operate on one of two models: pay-as-you-go credits or monthly subscriptions. Each has its pros and cons, depending on how you work.
- Pay-As-You-Go Credits: This is perfect for freelancers or anyone with an unpredictable project flow. You buy a block of credits to use for your generations, and they usually don't expire. It offers total flexibility, so you’re only paying for exactly what you create.
- Monthly Subscriptions: If you're consistently churning out content, a subscription almost always makes more financial sense. These plans typically give you a ton of credits for a lower per-credit price, and often throw in perks like faster generation times or better support.
Some platforms, like Auralume AI, offer both. You can start with credits to feel things out and then move to a subscription as your workload increases. It's a smart way to get started without a big commitment.
Navigating the Legal and Ethical Landscape
The incredible power of AI video generation brings a new set of responsibilities. As a creator, you absolutely have to stay on top of the legal and ethical side of the content you produce. This isn't just about covering your bases; it’s about earning trust with your audience and protecting your professional reputation.
The biggest gray areas right now are copyright and usage rights. The law is still catching up, but most platforms have terms of service that clearly state who owns the video and how you can use it commercially. Always, always read those policies before you use a generated clip for a client or on a monetized channel.
Transparency is your best friend here. While it might not be legally required, being upfront about your use of AI builds a ton of goodwill. A simple hashtag like #MadeWithAI or a quick note in your description shows you respect your viewers.
You also have to think about the ethical side of what you're making. Steer clear of creating content that's misleading, harmful, or uses someone's likeness without their permission. Being a responsible creator is the only way to build a lasting career in this space.
The Global Context of AI Video Creation
Looking at the global market really shows why unified platforms are becoming so essential. The hunger for AI-driven video is a worldwide thing. The Asia-Pacific region, for instance, already accounts for over 37% of the market and is expected to hit USD 2.34 billion by 2030, driven by a massive community of influencers and creators. This huge demand for short-form video is perfectly met by the speed of all-in-one hubs like Auralume AI.
And while North America is still a major player, the fact that cloud-based tools make up 78% of the market means your location doesn't matter anymore. Anyone, anywhere can create world-class content.
Answering Your Top Questions About AI Video
Jumping into AI video creation always sparks a few questions. It's a new frontier, after all. Whether you're wondering where to even begin or how to polish your workflow, getting some solid answers can make all the difference.
We get these questions all the time from creators, so let's tackle them head-on. Getting a handle on the different models, figuring out how to keep your brand's look consistent, and knowing what not to do will help you get better results, much faster.
Which AI Model Should I Use for Realistic Video?
This is the big one, but the honest answer is: it depends entirely on what you’re trying to create. There's no single "best" model for everything.
If you're aiming for that jaw-dropping, hyper-realistic look or need to generate complex scenes from scratch, you’ll probably want to look at heavy-hitters like Google Veo or Sora. They have an incredible grasp of real-world physics and are fantastic at keeping a character looking the same throughout a shot.
But what if you want something more artistic or stylized? For that, models like Pika or Kling can generate some truly stunning and imaginative visuals. The real pro move is to use a platform that gives you options. Something like Auralume AI puts multiple models at your fingertips, letting you experiment and find the right "director" for whatever project you're working on.
A quick tip from my own experience: The best model for bringing a still photo to life is almost never the same one you'd use to create a whole new scene from a text prompt. Having a variety of tools in your toolbox is a massive advantage.
How Can I Keep My AI Videos On-Brand?
Keeping a consistent look and feel is everything for brand recognition, and you don't have to give that up when using AI. The trick is to develop a "prompt template" that acts as your brand's visual recipe.
- Lock in Your Brand Colors: Be direct. Add phrases like "in a color palette of navy blue and gold" or "using warm, earthy tones" right into your prompts.
- Define Your Style: Are you known for a "minimalist design," "dramatic cinematic lighting," or a "vintage film aesthetic"? Make sure the AI knows it by including those terms every time.
- Keep Your Subjects Consistent: If you have a specific character or product, the image-to-video feature is your best friend. Start with the same source image for each clip, and you'll guarantee the subject looks identical every time.
Using a platform with a Prompt Wizard or a similar feature can be a huge time-saver here. It lets you store and reuse these core stylistic elements, so every video feels like yours without reinventing the wheel each time.
What Are the Biggest Mistakes People Make?
I see a few common trip-ups all the time: writing prompts that are way too vague, skipping the editing process, and forgetting about the ethical side of things.
A prompt like "a car driving" is a recipe for a generic, forgettable clip. You have to give the AI more to work with. Get specific! Try something like, "A vintage red convertible driving along a winding coastal road at sunset, cinematic 4K." See the difference?
Next, remember that the AI's output is just the raw footage. The real magic happens when you bring it all together. Don't expect a perfect, finished film from a single generation. Plan on creating a bunch of short clips and then assembling them in your favorite video editor. That's where you'll add music, sound effects, and pacing to truly bring your vision to life.
Finally, don't overlook the fine print. Always check the terms of service for whatever platform you're using, especially around copyright and commercial use. It's also just good practice to let your audience know you're using AI. That kind of transparency builds trust and shows you're being responsible with these powerful tools.
Ready to turn your ideas into cinematic reality? Auralume AI provides access to all the leading models, smart prompting tools, and upscaling features you need in one simple platform. Start creating for free today.