How to Storyboard a Video A Practical Guide for Creators
Ever wonder how filmmakers get those perfect shots? It’s not magic, and it rarely happens by accident. It starts with a storyboard.
Think of it as the comic-book version of your script. Before a single camera rolls, you're translating your written ideas into a sequence of simple drawings. Each panel maps out a specific shot, a camera angle, or a key piece of action. This visual outline is, without a doubt, the most powerful tool for planning your video’s narrative and style.
Why a Storyboard Is Your Video’s Blueprint
Trying to make a video without a storyboard is like building a house without a blueprint. You might have the best materials and a great crew, but you’ll end up with a chaotic, inefficient mess full of expensive mistakes. For video production, the storyboard serves that exact same purpose. It’s the plan everyone follows to make sure the final product matches the initial vision.
This isn't just about sketching pretty pictures. It's a critical communication tool that closes the gap between the words on a page and what you see on screen. When the director, cinematographer, and editor can all point to the same panel and agree on the composition, you kill the ambiguity that leads to painful, budget-draining reshoots.
The Strategic Value of Planning Visually
The real magic of a storyboard is that it lets you solve problems on paper instead of on a chaotic film set. It forces you to make tough creative calls early in the process.
- Pacing and Flow: Is the story dragging? Does that one section feel rushed? When you see the scenes laid out visually, pacing problems jump right out at you.
- Narrative Clarity: Does this transition make sense? Will the audience understand this key plot point? A storyboard will instantly reveal if your visual sequence is confusing or illogical.
- Resource Allocation: Planning shot by shot lets you build a precise shot list. You’ll know exactly which props, locations, and gear you need, which makes estimating your time and budget a whole lot easier.
This isn’t just a nice-to-have; it's how the pros work. Across the industry, 42.3% of filmmakers in the United States rely on storyboards to develop their stories. The market for storyboarding software is even projected to hit $5.2 billion, which tells you just how essential this stage is. You can dig into more data on professional storyboarding workflows to see the industry impact for yourself.
A storyboard isn’t about creating perfect art. It’s about creating perfect clarity. The goal is to communicate an idea so well that the entire team knows exactly what the final video should look, feel, and say.
Before we dive into building your own, let's quickly review the core components you'll find in every storyboard panel. This table breaks down the essentials.
Key Storyboarding Elements at a Glance
| Component | Purpose | Example |
|---|---|---|
| Panel/Frame | The box that contains the visual for a single shot. | A simple rectangle representing the screen. |
| Visuals | A sketch or image showing the shot's composition and key action. | A stick figure opening a door, a car driving down a road. |
| Shot Number | A sequential number to keep scenes organized. | "Shot 1," "Shot 2," "Shot 3" |
| Description/Action | A brief explanation of what is happening in the shot. | "Character walks to the window and looks out." |
| Dialogue/VO | Any spoken words or voiceover that accompanies the shot. | "I can't believe it's really you." (Dialogue) |
| Camera Moves | Instructions for camera movement. | "Pan right," "Zoom in," "Dolly forward" |
These elements are the building blocks of visual communication in pre-production. Getting them right ensures everyone is on the same page.
Unifying the Creative Team
Imagine a producer says they want a "dynamic, action-packed opening." The director might picture a sweeping drone shot over a cityscape. The animator, on the other hand, might be thinking of a rapid-fire motion graphics sequence. Without a visual reference, these two ideas are worlds apart and could lead to a lot of wasted time and effort.
A storyboard, even a rough one, grounds that abstract idea in a concrete image. It becomes the single source of truth that aligns everyone, from the client giving notes to the editor piecing together the final cut. This shared understanding is what prevents costly miscommunication and ultimately leads to a video that feels cohesive and makes an impact.
Turning Your Script into a Visual Game Plan
Alright, you've got your script locked down. Now for the fun part. This is where the words on the page start to breathe and take shape as a real video. We're moving from a document to a movie, and that means translating your script into a sequence of visual scenes.
The goal here isn't a one-to-one illustration of every line. It's about making smart, deliberate choices to tell your story visually. You need to put on your director’s hat. Read through the script again, but this time, ignore the dialogue for a moment. Instead, look for the visual beats—those key moments of action, emotional shifts, or important reveals. Each one of these is a prime candidate for its own storyboard panel.
At its heart, this is the essence of visual storytelling. You're forced to get critical about what the audience needs to see versus what they can just hear.
Finding Your Key Visual Moments
Look, not every sentence deserves its own shot. Your job is to break the script down into its most vital visual parts. A single paragraph of description might become one wide establishing shot, or it could be four rapid-fire, close-up cuts. So how do you decide?
Start by hunting for clear actions or shifts in the scene. I always look for moments where:
- A character's entire mood changes.
- A key object is introduced or used.
- The setting is revealed for the first time.
- The pacing needs to suddenly speed up or slow way down.
Any of these is a signal flare for a new storyboard panel. You're essentially mapping the visual journey that will carry the script, not just decorate it.
Pro Tip: Try reading your script out loud while picturing the scene in your mind's eye. Every time you instinctively see a new camera angle or your focus shifts to something different, jot it down. Those gut feelings are usually pointing you right where a new panel should go.
This simple diagram nails the overall flow—from the idea in your head to getting everyone on the same page and, finally, to actually pointing a camera at something.
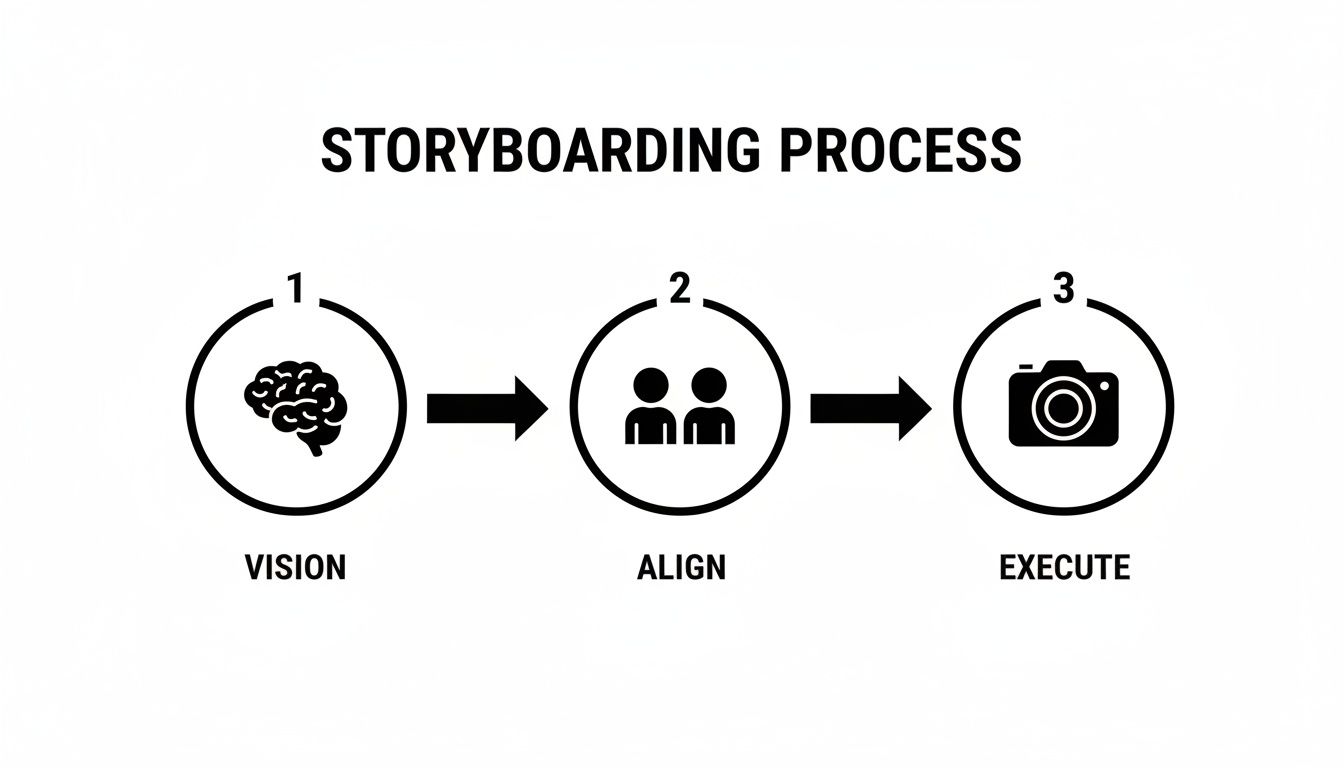
It’s this process of moving from vision to alignment to execution that makes storyboarding such a powerful tool in any production.
A Real-World Example: From Script to Scene
Theory is great, but let's get practical. Seeing this process in action with an actual script snippet is what makes it all click.
Here’s the original script segment:
A young coder, ANNA, sits hunched over her laptop in a cluttered, dimly lit bedroom. Empty coffee mugs litter her desk. She lets out a frustrated sigh, running a hand through her messy hair. Suddenly, her eyes widen as an idea strikes. With renewed energy, she begins typing furiously, a small smile forming on her face.
Now, let's break that paragraph into four distinct shots. We’re not just drawing what the words say; we're choosing specific shots to amplify the emotional journey.
The Shot-by-Shot Breakdown
-
Shot 1 - Wide Shot (WS): We open wide to establish the scene. The frame captures Anna at her messy desk, instantly telling us she's been grinding for hours. This single image sets the initial mood of frustration and burnout before a single word is spoken.
-
Shot 2 - Medium Close-Up (MCU): Now, we push in closer. This MCU focuses on Anna’s frustrated sigh and the tired gesture of running a hand through her hair. This tighter framing creates a more personal connection, making her struggle feel more immediate and relatable to the audience.
-
Shot 3 - Extreme Close-Up (ECU): This is the pivot point. We cut hard to an extreme close-up of just her eyes widening. Using a dramatic ECU like this isolates the "eureka!" moment, making it the most important visual beat in the sequence. It grabs the viewer's attention and signals a huge shift in energy.
-
Shot 4 - Medium Shot (MS): Finally, we pull back to a medium shot. We see her hands flying across the keyboard, the hint of a smile on her face. This shot pays off the tension from the previous shot and captures her newfound momentum, ending the little sequence on a triumphant and hopeful note.
See what we did there? This four-panel sequence built a complete mini-story. It started with despair, focused on a moment of pure inspiration, and ended with a feeling of victory. That’s the magic of intentional shot selection, and it all begins by breaking your script down into its most powerful visual beats.
Choosing Your Storyboarding Tools and Techniques
Alright, you’ve mapped your script to your scenes. Now for the fun part: bringing those scenes to life visually. This is where you decide how you’re actually going to create the storyboard, and you’ve got more options than you might think.
Before you start imagining you need to be a professional artist, let’s clear something up. You don't. The whole point of a storyboard is clarity, not a museum-quality drawing. Stick figures are completely fine if they get the idea across—the shot composition, where the characters are, and what they’re doing. Your team just needs to understand the vision, not admire your shading skills.
The Classic Approach: Pen and Paper
Never underestimate the power of a simple pencil and paper. For decades, some of the most iconic films began as humble sketches on paper or a stack of index cards. This method is immediate, tactile, and refreshingly free of technical glitches or software updates.
There’s a real creative freedom that comes with drawing by hand. It’s perfect for those initial brainstorming sessions when you just want to get ideas down fast without getting sidetracked by menus and settings. You can spread index cards across a table, physically shuffle them to tweak the pacing, and get a true bird's-eye view of your video's flow.
Best for:
- Rapid ideation and brainstorming.
- Solo creators or small teams working in the same room.
- Projects where speed and flexibility trump polish.
The obvious downside? Revisions can get messy, and sharing with a remote team is a pain. You'll find yourself snapping photos with your phone or scanning pages, which isn't the most efficient way to gather feedback.
Stepping Up to Digital Tools
This is where digital storyboarding tools offer a huge leap forward, especially if you're working with a team that isn't in the same room. The options range from simple templates to sophisticated, dedicated software built for the job.
The industry is definitely moving in this direction. The global storyboarding software market has been ballooning, growing from USD 165 million in 2023 to a projected USD 300 million by 2032. This isn't just a random trend; it shows a real shift toward digital-first workflows that make collaboration and creativity easier for everyone. You can dig deeper into the storyboarding software market trends and projections to see how things are evolving.
The best tool is always the one that gets out of your way and lets you focus on telling the story. Whether that’s a sharp pencil or a powerful app, pick what makes you fastest and clearest.
Digital tools immediately solve the biggest headaches of the pen-and-paper method. Edits are clean, sharing is instant, and you can duplicate panels or elements to save a ton of time.
Navigating Your Digital Options
When you go digital, you can take a few different paths. Your choice will likely come down to your budget, your comfort level with technology, and how complex your project is.
-
Presentation Software (PowerPoint, Google Slides): Don't sleep on this option—it’s surprisingly effective and accessible. Each slide becomes a storyboard panel where you can drop in sketches, inspiration photos, or AI-generated images. Adding notes is simple, and reordering slides to nail the sequence is a breeze.
-
Graphic Design Software (Adobe Photoshop, Procreate): If you're already comfortable with layers and digital drawing, tools like these offer complete creative control. You can create detailed digital illustrations or simple line drawings, and you can easily find templates to start with pre-made panel layouts.
-
Dedicated Storyboarding Software (Storyboarder, Plot): These are the specialized tools built for one purpose. They come packed with features like aspect ratio guides, camera movement indicators, and timelines for creating basic animatics. Many, like Storyboarder, are free and perfect for getting started.
-
All-in-One Production Platforms (Celtx): For larger, more complex productions, platforms like Celtx integrate storyboarding directly into the scriptwriting, scheduling, and other pre-production tasks. This creates a single, unified hub for the entire team.
Storyboard Tool Comparison
To help you figure out what makes the most sense for you, here’s a quick breakdown of the most common methods.
| Method | Best For | Pros | Cons |
|---|---|---|---|
| Pen & Paper | Rapid brainstorming, solo creators. | Fast, no cost, tactile. | Hard to edit, difficult to share. |
| Templates (Slides) | Beginners, budget-conscious teams. | Easy to use, collaborative. | Lacks specialized features. |
| Digital Art Apps | Artists, visually detailed projects. | High creative control, professional look. | Can have a steep learning curve. |
| Dedicated Software | Serious creators, professional teams. | Industry-standard features, efficient workflow. | Can be expensive, may be overkill. |
Ultimately, there's no single "right" tool—just the right tool for your workflow. My advice? Start simple. A free template in Google Slides is a fantastic way to learn the ropes without spending a dime. As your projects get more ambitious, you can always explore the more specialized tools that the pros use.
Adding the Details That Bring Your Vision to Life
Your storyboard sketches are the skeleton, but the annotations—the notes and details you add to each frame—are the nervous system that makes everything work together. A drawing shows what a shot looks like. The notes tell your crew how to actually create it.
Without these crucial details, you’re leaving your vision completely open to interpretation. And trust me, that's a surefire recipe for on-set confusion, frustrating reshoots, and wasted money.
Think of each panel in your storyboard as a mini-production plan. It needs to communicate not just the visual composition, but all the technical and auditory information required to execute it perfectly. This is what separates a rough idea from a professional, actionable blueprint.
This level of detailed planning isn't just a "nice-to-have"; it's how entire industries function. The global animation industry, for example, hit a market size of around $371.85 billion in 2024. That massive industry runs on the precision that detailed storyboards provide, where every timing cue and action note is non-negotiable. You can learn more about the latest animation industry statistics and trends to see just how critical this planning is on a global scale.
Describing Camera Movements and Actions
Your camera is the audience's eye, and how it moves completely dictates the energy and focus of a scene. Just sketching a character’s face isn’t enough. Is the camera slowly pushing in to build tension? Or is it panning across a room to reveal a hidden clue?
Be specific. Use clear, universally understood language to describe these movements. Arrows drawn right on the panel are great for visual shorthand, but they need to be backed up by written notes for total clarity.
- Pan Left/Right: The camera turns horizontally from a fixed spot.
- Tilt Up/Down: The camera pivots vertically from a fixed spot.
- Zoom In/Out: The lens adjusts to make the subject appear closer or farther away.
- Dolly In/Out: The entire camera physically moves toward or away from the subject. This feels more natural and immersive than a zoom.
- Truck Left/Right: The entire camera moves horizontally, parallel to the action (like tracking alongside a walking person).
Annotations transform a static image into a dynamic instruction. A panel showing a car is just a car. A panel with an arrow and the note "TRUCK RIGHT, follow car as it speeds away" is a complete directorial command.
This kind of clarity prevents expensive guesswork on set. When the cinematographer sees "DOLLY IN SLOWLY," they know you want a gradual, suspenseful movement, not a quick, jarring push.
Timing Dialogue and Sound Cues
Video is an audiovisual medium, so your storyboard has to account for sound. What does the audience hear during each shot? Your annotations need to map out the entire soundscape.
Under each panel, jot down the specific lines of dialogue, voiceover, or key sound effects (SFX) that synchronize with the visuals. If a character yells, "Look out!" just as a car screeches around the corner, note both the dialogue and the SFX for that panel.
This is also a fantastic way to control the pacing of your video. By assigning dialogue and sounds to specific shots, you can feel the rhythm of a scene long before you ever start filming.
Example Shot Annotation
Let’s look at how these notes bring a simple shot to life:
Shot 12: MCU - Protagonist
- Action: Her eyes widen in realization. Camera does a slow PUSH IN to an ECU (Extreme Close-Up).
- Dialogue: (Whispering) "It was him... all along."
- SFX: Faint, ominous musical sting begins.
- Timing: 4 seconds.
Without these notes, it’s just a drawing of a face. With them, it’s a complete narrative moment packed with emotion, sound, and a clear duration for the editor.
Creating a Common Language on Set
Ultimately, the goal of adding all these details is to create a shared vocabulary for your entire production team. Everything runs smoother when everyone from the director to the sound designer is working from the same plan.
This meticulous approach removes ambiguity and empowers your crew to execute your vision with confidence. Every note you add is an investment that pays off tenfold by saving time, reducing frustration, and ensuring the final video is exactly what you imagined.
How AI Can Supercharge Your Storyboarding Workflow
Let's be honest: not everyone can draw. For years, that was a major hurdle in storyboarding. If you couldn't sketch, you were stuck with crude stick figures or had to hire an artist. But artificial intelligence has completely leveled the playing field, turning your clarity of vision—not your drawing skill—into the most important asset.
Think of AI image generators as your personal concept artist on standby. They can take a simple text description and spit out a high-quality visual reference in seconds.
Instead of getting hung up on the technicalities of drawing, you can now generate detailed, mood-setting images for every single scene. This is a massive time-saver. It lets you focus on what really matters: the composition, the camera angles, and the emotional core of your story. You get to produce polished, compelling visuals that genuinely reflect the final video you see in your head.

This approach creates an incredibly clear bridge between your script and the actual shots, ensuring everyone—from your cinematographer to your client—is on the exact same page about the intended look and feel.
Writing Prompts That Think Like a Director
The magic of AI-generated images lies entirely in the quality of your prompts. If you give it vague requests, you'll get generic, uninspired results. To create truly cinematic visuals, you have to start thinking like a director and feed the AI specific, descriptive instructions.
Your job is to guide the AI with precision. "A man in an alley" won't cut it. You need to layer in the language of filmmaking.
- Shot Type: Is it a
wide shot,medium close-up, or anextreme close-up? - Camera Angle: Are you looking for a
low-angle shotto make someone look powerful, ahigh-angle shot, or a neutraleye-levelperspective? - Lighting: Use evocative terms like
dramatic film noir lighting,soft morning light, orneon-soakedto set the mood. - Mood & Style: Add stylistic descriptors like
cinematic,ethereal,gritty, orvintage 16mm film style. - Action & Emotion: What is the subject doing and feeling? Something like
looking pensively out a rain-streaked windowadds a ton of context.
When you combine these elements, you turn a bland idea into a powerful visual command. For example, a prompt like "dramatic low-angle shot of a detective in a rain-soaked alley, film noir lighting, cinematic, 35mm film grain" will give you a far more compelling and useful image. Tools like the one from Auralume AI are built specifically to help you craft these kinds of professional prompts and generate stunning visuals.
A well-crafted prompt isn't just a description; it's a directorial command. The more specific you are about lighting, composition, and mood, the closer the AI will get to the image in your head.
Juggling Speed and Consistency
Using AI for storyboarding is incredibly fast, but it introduces a new challenge: keeping everything visually consistent. If you're not careful, your main character or key locations can look different from one panel to the next, which is a sure-fire way to confuse your team.
Fortunately, there are a few simple strategies to keep things on track.
First, "anchor" your prompts. Find specific descriptive phrases for your characters and settings and reuse them every time. For instance, always refer to your protagonist as having "messy brown hair, a worn leather jacket, and tired eyes."
An even better technique is to create a character sheet or location guide before you even start storyboarding. Generate one definitive image for each main character and important location. You can then use these as a reference to maintain continuity across all your panels. It’s a small bit of prep work that prevents massive headaches later. You can even explore new ways of using AI for brainstorming to boost creativity during this phase.
Ultimately, AI is a tool—a brilliant one—that should enhance your creative direction, not replace it. By using it thoughtfully, you can produce a professional-grade storyboard with incredible speed and detail, no matter your ability to draw.
Common Storyboarding Questions Answered
Even with a clear process, a few questions always seem to pop up, especially when you're new to storyboarding. Let's tackle the most common ones I hear so you can get back to creating.
Do I Need to Be a Great Artist to Storyboard?
Absolutely not. This is probably the biggest myth about storyboarding, and it holds so many people back. The goal here is clarity, not a masterpiece.
Honestly, a well-placed stick figure that clearly shows the shot composition is a thousand times more useful than a gorgeous drawing that's confusing. Your team just needs to understand what's in the frame, where the characters are, and what's happening. If you can get that across with simple shapes and arrows, you've nailed it.
How Many Panels Should My Storyboard Have?
There's no magic number. It really depends on your project. A quick 30-second social media ad might only need 5-10 panels to hit the main points. On the other hand, a detailed 5-minute explainer video could easily run 50 panels or more.
A good rule of thumb is to create a new panel for every significant change. That means a new panel for:
- A major new action
- A different camera angle or move
- A change of scene
For example, a single shot where the camera just pans from one person to another? That might only need one panel with an arrow showing the movement. But a quick back-and-forth dialogue with lots of cuts? Each one of those cuts deserves its own panel.
Don't obsess over the count. Just focus on telling the story. If a moment feels visually important or pushes the narrative forward, it probably needs its own panel.
What Is the Difference Between a Storyboard and an Animatic?
It's easy to get these two mixed up, but they're different tools used at different points in the pre-production process.
-
Storyboard: Think of this as your static, comic-book-style blueprint. Its job is to lock down the visual plan—what the shots look like, where everyone is standing, and the key moments of action.
-
Animatic: An animatic is the next step. It's a rough video made by putting your storyboard panels into a timeline and adding sound—maybe a scratch voiceover, some temporary music, or sound effects.
The whole point of an animatic is to get a feel for the timing and pacing of your video. It helps you see if a scene drags or feels too rushed before you start the expensive work of filming or animating. For anything with complex timing or action sequences, an animatic is a lifesaver. It’s basically a low-res prototype of your final video.
Ready to turn your ideas into stunning visuals without needing any drawing skills? Auralume AI is an all-in-one video platform that generates cinematic clips from simple text prompts or animates your still images in seconds. With access to leading AI models and a built-in Prompt Wizard to guide you, creating professional-quality video content has never been easier. Explore the possibilities at the Auralume AI website.