How to Create AI Video From Text and Images
At its heart, creating an AI video is about giving an AI model a clear instruction—either a text prompt or a still image—and letting it generate a moving clip. You describe the scene you're picturing in your head, or you upload a picture you want to bring to life, and the AI does the heavy lifting. This whole process sidesteps the need for clunky software or traditional filmmaking skills.
Your Practical Starting Point for AI Video
Diving into AI video for the first time might seem a little intimidating, but it’s actually more straightforward than you’d think. The entire workflow, from a simple idea to a finished piece of video, has become surprisingly accessible. Forget needing a fancy studio or years of editing experience; right now, your own creativity is the most powerful tool you have.
This guide is here to cut through the noise and give you a clear, practical path. We'll concentrate on how all-in-one platforms make the whole thing manageable, letting you focus on the fun, creative parts instead of getting bogged down in technical details.
Simplifying the AI Video Workflow
The road from concept to final cut is a lot shorter these days. If you're looking for a quick overview, this a concise guide on how to create videos with AI is a great place to see some immediate wins. No matter which platform you choose, the basic steps are pretty much the same.
This flowchart maps out the simple, three-stage process that most AI video generation follows.
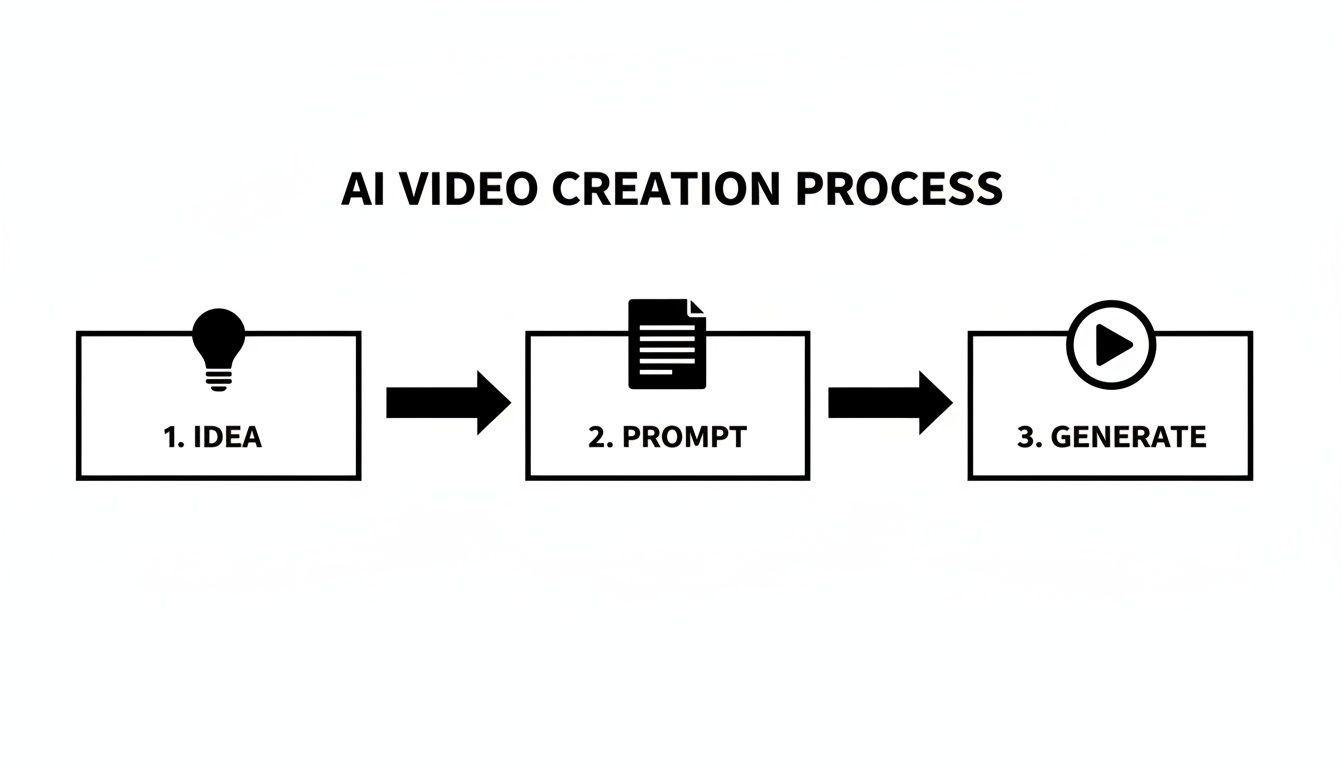
As you can see, it all begins with a good idea. From there, you just need to translate that idea into a descriptive prompt that tells the AI exactly what to build.
Why an All-in-One Platform Matters
Juggling different tools for different AI models is a headache. A unified platform is a game-changer because it pulls the best models, like Google Veo and Sora, into one cohesive interface. This lets you pick the right "flavor" for each project without having to learn a half-dozen different systems.
It’s an approach that saves a ton of time and just makes sense. For instance, platforms like https://www.auralumeai.com/ are built to put a whole suite of creative tools and models right at your fingertips.
This guide will serve as your roadmap, filled with practical, actionable advice. We’re going to cover:
- Crafting effective prompts: How to write descriptions that get you the exact results you're imagining.
- Choosing the right model: Understanding the stylistic quirks of each model and knowing when to use them.
- Animating static images: Bringing your favorite photos and illustrations to life with realistic motion.
- Applying professional touches: Adding those final bits of polish that make your clips look high-quality.
My goal here is to show you that creating impressive, professional-looking AI video is completely within your grasp, even if you're starting from scratch. The technology is here to help bring your vision to life, not make it more complicated.
Choosing the Right AI Model for Your Vision
Picking an AI model is the very first creative decision you'll make, and it has a massive impact on the final video. It's a lot like choosing between different camera lenses or film stocks—each one brings its own unique character to the table. Some models are built for hyper-realistic, cinematic footage, while others are geared toward surreal, artistic animation.
Knowing what each model does best is the key to getting great results every time. Platforms like Auralume AI make this much easier by bringing powerhouse models like Google Veo, Sora, and Kling all under one roof. This setup lets you match the right tool to your vision without having to juggle a dozen different websites.
This is a big deal, especially when you look at the numbers. The AI video market was valued at an incredible USD 11.2 billion in 2024 and is on track to hit USD 246.03 billion by 2034. That’s a compound annual growth rate of 36.2%! This growth is all about the demand for creating stunning videos from just a few words or a single image—which is exactly what we're here to do.
Comparing the Top AI Video Models
To get the video you want, you have to pair your goal with the model's specialty. Are you trying to make a punchy, scroll-stopping social media ad? Or maybe a slow, dreamlike visual for an art project? Your answer points directly to the right tool for the job.
Here’s a quick rundown of some of the heavy hitters you’ll find on Auralume AI:
- Google Veo: This is your go-to for cinematic realism. Veo is fantastic at understanding nuance in prompts and consistently kicks out high-definition clips that look and feel professional.
- Sora: If you're working on a narrative or a scene with a lot going on, Sora is a great choice. It's known for keeping things consistent over longer clips, which is crucial for storytelling.
- Kling: A newer model that's making waves with its ability to generate believable motion. If your video needs realistic physics and character interactions, Kling is a strong contender.
- Pika: Leaning more towards the artistic side? Pika excels at creating beautiful, imaginative animations that don’t need to follow the rules of reality.
If you’re diving into the commercial side of things, it’s also worth checking out resources that cover AI-driven ad creative generation, as they often provide great insights into how these models perform in a marketing context.
Practical Scenarios for Model Selection
Let's move from theory to practice. Here’s how this plays out in a few real-world situations.
Scenario 1: Product Ad for a New Sneaker You need a dynamic shot of the shoe in a gritty, urban setting with realistic lighting.
- Best Choice: Google Veo. Its knack for high-fidelity, cinematic footage will make that sneaker look incredible.
Scenario 2: Animated Music Video with Surreal Visuals The goal is to create a video that flows between abstract shapes and dreamlike landscapes. Style is everything; realism isn't a concern.
- Best Choice: Pika. It's built for exactly this kind of creative, artistic expression.
Scenario 3: Short Film Scene in a Busy Café You have two characters talking, and you need them to look consistent from shot to shot.
- Best Choice: Sora. Its strength in maintaining scene and character consistency makes it the most reliable option for narrative work like this.
The biggest takeaway here is to stop thinking of these models as interchangeable. Treat them like specialized tools in your creative kit. The more you experiment, the faster you'll learn their personalities and master creating AI videos that perfectly capture what's in your head.
AI Video Model Selector Guide
To make the choice even clearer, here’s a quick-reference table comparing the top AI video models available on Auralume AI. Keep it handy to guide your next project.
| Model Name | Best For | Key Strengths | Example Use Case |
|---|---|---|---|
| Google Veo | Cinematic Realism | High-definition output, nuanced prompt understanding, consistent lighting. | Creating a professional-looking commercial for a luxury car. |
| Sora | Complex Narratives | Long-duration consistency, object permanence, multi-element scenes. | Generating a short animated story with recurring characters. |
| Kling | Realistic Motion | Physically accurate movement, detailed character interactions. | A sports clip showing an athlete performing a complex action. |
| Pika | Artistic Animation | Stylized visuals, imaginative transformations, dreamlike aesthetics. | An eye-catching, animated lyric video for a new song. |
Ultimately, the best way to learn is by doing. Pick a model that seems like a good fit, give it a prompt, and see what you get. You'll be surprised how quickly you develop an instinct for which tool to grab for any given project.
Mastering the Art of the AI Video Prompt
When it comes to creating AI video, your prompt is everything. Seriously. It’s your director's script, your storyboard, and your shot list all rolled into one. A lazy, one-line prompt will get you a generic, soulless clip. But a well-crafted prompt? That's how you create footage that feels intentional and looks genuinely cinematic.
Developing this skill is probably the single most important thing you can do. It’s the difference between telling the AI "a car driving" and commanding it to create "drone footage of a vintage red convertible driving along a winding coastal road at golden hour, shot on 35mm film." One is a vague wish; the other is a clear vision.
Deconstructing a Powerful AI Video Prompt
A great prompt isn't just a sentence; it’s a layered instruction built from several key ingredients. By breaking it down, you can make sure you’re giving the AI all the information it needs to bring your idea to life, leaving as little as possible to chance.
Think of it like building a scene from the ground up. You need three core elements to start:
- The Subject: This is your "who" or "what." Be specific. Instead of just "a woman," try "a young woman with curly red hair and freckles."
- The Action: What is your subject doing? Verbs are your friend here, and descriptive ones are even better. "Walking" is fine, but "strolling leisurely" or "sprinting urgently" paints a much richer picture for the AI.
- The Setting: Where is all this happening? Again, details matter. "A forest" becomes "a dense, misty pine forest with sunlight filtering through the canopy."
These three pieces form the foundation. But to really level up your work and get professional-looking results, you have to start thinking like a cinematographer.
Adding Cinematic Language for Pro Results
This is where the real magic kicks in. By weaving filmmaking terms into your prompts, you seize control over the look, feel, and mood of your video. You stop being a passenger and start being the director.
Let's see this in action. We'll start with a bland, basic idea.
Basic Prompt:
A man sits at a desk and writes in a notebook.
An AI will probably spit out something flat and uninspired. Now, let’s inject some cinematic detail.
Advanced Prompt:
Low-angle shot of a thoughtful, middle-aged detective sitting at a cluttered wooden desk in a dimly lit office. He writes intently in a worn leather notebook, a single desk lamp casting long shadows across the room. Cinematic lighting, hyperrealistic, shot on 35mm film.
The difference is night and day, right? The second prompt gives the AI precise instructions on everything from camera placement and character details to lighting, mood, and artistic style. This is how you create AI video that doesn't just look generated but looks designed.
Fine-Tuning Your Vision with Modifiers
Beyond the core scene, you can use specific keywords—I call them "modifiers"—to really dial in the aesthetic. Think of these as your stylistic shortcuts.
Camera and Shot Type Modifiers
- Camera Angle:
low-angle shot,high-angle shot,dutch angle,eye-level shot - Camera Movement:
panning shot,tilting shot,dolly zoom,handheld footage - Shot Distance:
extreme close-up,medium shot,wide shot,drone footage
Lighting Modifiers
- Mood:
cinematic lighting,dramatic lighting,soft light,neon glow - Time of Day:
golden hour,blue hour,midday sun,moonlight
Artistic Style Modifiers
- Realism:
hyperrealistic,ultra-detailed,8K resolution - Film Stock:
shot on 35mm film,vintage film look,technicolor - Art Style:
anime style,watercolor painting,pixel art,surrealism
The key is to mix and match these elements to build a complete picture. Don't just throw keywords in randomly. Each modifier should serve a purpose in bringing your specific vision to life.
Using Auralume AI’s Prompt Wizard
Look, I get it. Manually crafting the perfect prompt from scratch takes practice. This is where a good tool can make a world of difference. Inside Auralume AI, for example, you’ll find the Prompt Wizard. It basically acts as a co-pilot, helping you transform a simple idea into a detailed instruction the AI can actually work with.
You start with a basic prompt, and the Wizard analyzes it, suggesting ways to add more detail. It might ask you to clarify the lighting, pick a camera angle, or define an artistic style. It walks you through the exact process we just covered, making sure you don't forget the little things that make a video pop.
This is a fantastic feature whether you're just learning the ropes or you're a seasoned pro looking to speed up your workflow. It takes the guesswork out of the equation and helps you build complex, powerful prompts much faster. You'll find yourself learning the principles of good prompt engineering just by using it.
At the end of the day, mastering the art of the prompt is all about being descriptive, specific, and intentional. The more detail you feed the AI, the more control you have over what comes out. Start with a simple idea, then layer in your subject, action, setting, camera work, lighting, and style. With a bit of practice, you’ll be translating your biggest ideas into stunning video clips.
Breathing Life Into Still Images with Motion
One of the coolest things you can do with AI video is take a static image and make it move. This is a game-changer for anyone—artists, marketers, you name it—who wants to create engaging visuals without getting bogged down in traditional animation software. You can turn a simple product photo or a piece of digital art into something that genuinely stops people from scrolling.
The whole process is a lot less complicated than it sounds. You just feed the AI a source image, give it a few simple directions on how you want it to move, and it does all the heavy lifting, generating the motion frame by frame. The end result is a short, seamless clip that feels alive.
Choosing the Right Image to Animate
The old saying "garbage in, garbage out" absolutely applies here. Not every image is a great candidate for animation, and the quality of your final video really hinges on the quality of the picture you start with. A strong source image gives the AI a solid foundation to work from, which means more natural, believable movement.
Here’s what I look for in a good source image:
- A Clear Subject: The AI needs a distinct focal point to anchor the animation, whether it's a person, an object, or a key feature in a landscape.
- Good Depth: Images with a clear foreground, midground, and background are gold. They allow the AI to create really impressive parallax effects, where different layers seem to move at different speeds.
- High Resolution: Start with a sharp, high-res image. This will save you a lot of headaches later on and prevent the final video from looking blurry or pixelated, especially after upscaling.
- Implied Motion: Look for images where movement already feels natural. A picture of a waterfall, a car on a road, or clouds in the sky gives the AI a huge head start.
This technique is exploding in popularity for a reason. Creative AI video generators are quickly reshaping content production, holding a 38.1% market share. This corner of the industry is set to jump from USD 0.31 billion in 2024 to USD 1.18 billion by 2029. A huge driver is the demand for animating stills for social media (making up 40% of usage) and marketing. If you want to dive deeper into the numbers, you can get the full report on the AI video generation market.
Directing the Motion with Simple Commands
Okay, so you've got your image. Now it's time to tell the AI what to do with it. You don't need to know how to code or have any animation experience. Instead, you'll use simple text commands or settings within a tool like Auralume AI to control the camera and subject movement.
These are the main controls you'll be working with:
- Pan: This is a horizontal camera move, either left or right. A slow pan is perfect for revealing a wide, sweeping landscape.
- Tilt: This moves the camera vertically, up or down. Tilting up can make a mountain or skyscraper feel massive and imposing.
- Zoom: Moving the camera closer (zoom in) or farther away (zoom out) is the classic way to draw attention to a specific detail.
- Motion Strength: This is usually just a slider that controls how intense the movement is. Low values give you subtle, gentle motion, while high values create much more dramatic action.
Pro-Tip: Always start with a very low motion strength. I see so many people make the mistake of cranking it up too high, which almost always looks fake and jittery. A subtle, slow zoom or a gentle pan is usually far more cinematic and effective.
Adding Polish with Atmospheric Effects
Beyond the basic camera moves, you can really elevate your video by adding atmospheric effects. These are the small details that can dramatically boost the realism and mood of your animated image.
For example, if you're working with a forest scene, adding a prompt like "subtle drifting fog" or "gentle falling leaves" can make the whole thing feel way more immersive. Animating a cityscape? Try "flickering streetlights" or "rain drops on the lens" to create a moody, noir vibe.
Combining these kinds of atmospheric prompts with a slow, deliberate camera pan is a fantastic recipe for creating AI video that looks both professional and artistic. By getting a handle on these simple techniques, you've got a powerful and cost-effective way to produce content that truly stands out.
Refining and Upscaling Your AI Generated Clips

Getting that first AI clip to render is a huge win, but that's just your starting point. Think of the raw output as your digital "dailies" or raw footage. The real magic, the part where art meets science, happens during post-production. This is where you transform a neat AI experiment into a polished, professional-looking video.
It’s a lot like a photographer working in a darkroom. The initial shot is just the capture; the developing process is where the final image truly comes to life. Your AI-generated clips need that same level of care to build cinematic quality, pack an emotional punch, and tell a coherent story.
Boosting Resolution with AI Upscalers
Most AI video generators create clips at a pretty standard, low resolution. It’s fine for a quick preview, but it’s not going to look great on a big screen. To get that crisp, high-definition finish, you need to upscale your footage. An upscaler is a tool that uses AI to intelligently increase the video's resolution, adding detail and sharpening edges without that blocky pixelation you want to avoid.
Thankfully, platforms like Auralume AI build these tools right into their workflow, which is a massive time-saver. Their built-in Video Upscaler can take a standard-def clip and bump it up to a sharp 4K with just a couple of clicks. This is an absolutely crucial step if you want your final product to look professional on platforms like YouTube or Vimeo.
In practice, the process is pretty straightforward:
- Pick your clip: Grab the generated video you want to enhance.
- Set your target resolution: You’ll usually see options like 2K or 4K. I always recommend going for 4K if you can.
- Let the AI work: The tool analyzes every frame, intelligently adds new pixels, and sharpens details to create your new high-res file.
Don’t skip this step. Seriously. A proper 4K upscale is often the single biggest difference between an AI video that looks like a hobbyist experiment and one that looks professionally produced. It delivers a level of clarity audiences just expect now.
This demand for high-quality, easily-made video is why the AI video generation market is exploding. North America is expected to grab a 41% market share by 2025, with the market value jumping from USD 293.8 million to USD 349.7 million by 2026. This incredible growth is fueled by creators and businesses who need an efficient pipeline from prompt to final render. You can dive deeper into these numbers in this comprehensive market analysis.
Stitching Clips into a Cohesive Story
A single, four-second clip is just a moment in time. A story is a sequence of those moments. This is where you'll need to do some basic video editing. You don’t need to spring for a Hollywood-grade software suite—any simple, intuitive editor will get the job done.
Just import all your upscaled clips and start arranging them on the timeline. Think about the narrative and the pacing. Do you want fast cuts for a high-energy vibe, or are you going for longer, slower transitions to create a more contemplative mood? Often, a simple, clean cut or a gentle cross-dissolve is all you need to connect your scenes.
Adding Sound and Color Correction
Never underestimate the power of audio. It’s easily half the viewing experience. The right music track or a few well-placed sound effects can completely shift the emotional tone of your video. A sweeping orchestral score can make a simple AI landscape feel epic, while a subtle, ambient track can make it feel intimate and calm.
The final layer of polish is color correction. Even minor tweaks here can make a world of difference.
- Increase Contrast: This will make your blacks deeper and whites brighter, giving the video a much more dynamic, "poppy" look.
- Boost Saturation: A slight bump in saturation can make the colors feel more vibrant and alive.
- Apply a LUT: A Look-Up Table (LUT) is essentially a professional color filter. Many editors have built-in LUTs that can instantly give your footage a cinematic style, like a warm "golden hour" glow or a cool, moody blue tint.
By layering these techniques—upscaling for clarity, editing for narrative, sound for emotion, and color for mood—you’ll take your raw AI generations and turn them into genuinely compelling videos.
Common Questions About Creating AI Videos
As you start diving into AI video, you're bound to run into some practical questions. It happens to everyone. From figuring out costs and legal rights to just making your workflow smoother, getting good answers is what turns you from a beginner into a pro.
Let's walk through some of the most common hurdles creators face. Getting these details sorted out frees you up to focus on what really matters: being creative.
How Much Does It Cost to Create AI Videos?
The good news is that creating AI video is a world away from the costs of traditional production. Forget about expensive cameras, locations, and crew. Most platforms, including Auralume AI, run on a simple credit-based system, which is incredibly flexible.
- Pay-as-you-go Credits: This is perfect if you’re just starting out or only need videos every now and then. You buy a pack of credits and use them as you go. With Auralume AI, the credits don’t expire, so there's no pressure to "use it or lose it."
- Subscription Plans: If you're creating content regularly—say, for an agency or a social media channel—a monthly plan is usually the way to go. You’ll get a bigger bundle of credits for a better price, and often some extra perks like faster generation speeds.
This model blows the doors open for creativity, letting you produce a ton of content without the massive overhead you’d normally expect.
What Are the Commercial Usage Rights for AI Videos?
This is a big one. If you’re making videos for your business, marketing, or a client, you need to know you can actually use them. Generally speaking, the content you create on a reputable platform is yours to use commercially.
That said, the legal side of AI-generated content is still evolving. The smartest thing you can do is check the terms of service for whatever platform you’re on. A quality service like Auralume AI will have clear documentation that grants you the license you need for most commercial work.
A great rule of thumb is to avoid prompting for copyrighted characters, specific brand names, or well-known artists' styles. Sticking to your own original ideas helps you sidestep any potential legal gray areas and keeps your work uniquely yours.
How Do I Ensure Consistency Across Multiple Clips?
Keeping a consistent look and feel across several clips is one of the trickiest parts of building a longer video. The key is to craft a super-detailed "seed" prompt that you can reuse as a foundation. Think of it as your project's style guide.
Your seed prompt should lock in the core elements you don't want to change.
- Character Descriptions: Get granular. Instead of "a man," try "a man in his 40s with salt-and-pepper hair, wearing a worn brown leather jacket and a gray t-shirt."
- Location Details: Define the world. For example, "a cozy library with dark oak shelves, a green leather armchair, and a single window letting in soft afternoon light."
- Artistic Style: Always tack on the same stylistic keywords. For every prompt in the series, you might use "shot on 35mm film, cinematic lighting, hyperrealistic."
By reusing this core prompt and only tweaking the action or camera angle, you give the AI a strong visual anchor. It's also critical to stick with the same AI model for the entire project. From there, any minor jumps can usually be smoothed out with a little color grading in post-production.
Can I Use My Own Images or Videos as a Base?
Yes, and this is where things get really interesting. Most powerful AI video tools, Auralume AI included, let you upload your own assets to use as a starting point. This could be anything from a product photo to a logo or a piece of digital art.
This image-to-video feature is a true game-changer for creative control. It opens up all kinds of possibilities for breathing new life into content you already have. For example, you could take a static product shot and add subtle, eye-catching motion for a social media ad, or animate a cool illustration with atmospheric effects. It’s the perfect bridge between your existing brand assets and the dynamic potential of video.
Ready to transform your ideas into stunning visuals? Auralume AI provides all the tools you need—from powerful model selection and prompt assistance to video upscaling—in one intuitive platform. Start creating your first AI video for free today!