How to Create Videos with AI and Actually Get Good Results
At its core, creating a video with AI means using a platform to generate video clips from text prompts or animate still images. Tools like Auralume AI provide a creative sandbox where simple ideas can become polished, cinematic visuals in just minutes, completely upending the traditional approach to video production.
The New Reality of AI Video Creation

Welcome to a completely new way of thinking about video production. The days when stunning visuals were reserved for studios with massive budgets are over. This guide cuts through the noise to show you how to make genuinely compelling, professional-looking videos with AI. We're going to skip the fluff and get right into the practical, actionable steps.
Recent leaps in AI have blown the doors wide open for creators. What used to demand expensive gear, complicated software, and years of training can now be done with a great idea and the right tools. This isn't just a fleeting trend; it’s a fundamental change in how we bring stories to life.
Why This Skill Matters Now
Getting good at AI video creation is about more than just keeping up—it's about getting ahead. This technology is now in the hands of everyone, from marketers and indie filmmakers to teachers and artists. Knowing how to guide these tools effectively gives you a serious edge, letting you produce incredible content faster and more affordably than ever before.
Throughout this guide, we'll explore how platforms like Auralume AI are making professional video creation possible for anyone with a vision. You'll learn everything you need to know, including:
- How to generate entire scenes from simple text descriptions.
- The techniques for animating still images to add life and motion.
- Ways to write detailed prompts that produce truly cinematic results.
- Tips for editing and polishing your AI clips into a finished video.
The growth here is impossible to ignore. The global AI video generator market was valued at USD 554.9 million in 2023 and is expected to rocket to nearly USD 2 billion by 2030. This explosion, tracked by sources like Grand View Research, shows just how much video production is changing across every industry.
Key Takeaway: Learning to create videos with AI isn't just about adding a new app to your workflow. It's about unlocking a faster, more flexible, and more imaginative way to tell stories that truly connect with an audience.
We're going to give you a clear, honest look at what you can achieve right now. The focus is on real-world application, helping you take a simple concept and turn it into a high-impact video that grabs attention and delivers your message.
Mapping Out Your AI Video Blueprint
Before you even think about generating a single clip, the most important work you'll do happens completely offline. A solid plan is what separates a polished, professional video from a jumbled mess of cool-looking AI shots. This is where you translate that spark of an idea into a concrete set of instructions the AI can actually understand and execute.
Trust me, jumping straight into prompting without a clear vision is a recipe for frustration. It’s like trying to build a house without a blueprint—you'll burn through time and credits, ending up with something that just doesn't hang together. A little planning up front ensures every visual, every scene, and every cut serves your story.
This isn't about boxing yourself in; it’s about making smart creative choices from the start.
Anchor Your Video with a Core Message
Every great video, whether it's a 30-second TikTok or a five-minute short film, hinges on a single, powerful idea. What's the one thing you want your audience to walk away with? Nail this down first, because it will steer every other decision you make.
Are you trying to capture the sleek elegance of a new product? Tell a heartfelt story about a kid and their dog? Or create a high-octane montage that gets people hyped?
Boil it down to one sentence. For instance:
- Product Ad: "This video will make our new smartwatch feel like a piece of timeless, high-tech jewelry."
- Short Film: "A lonely robot finds a flicker of hope and friendship in a post-apocalyptic city."
- Social Promo: "This clip needs to feel like the pure adrenaline rush of hitting a new mountain bike trail for the first time."
This sentence is your North Star. It keeps you on track and stops you from getting lost in all the creative possibilities.
Scripting for an AI Director
Writing for an AI is a completely different beast than writing for human actors. You can't rely on subtext or subtle performance cues. You have to become a painter, using words to create an incredibly detailed and literal picture for the AI to interpret.
A traditional script might say, "A character walks sadly down the street." That's way too vague for an AI.
An AI-friendly script needs to be more like this: "A lone figure in a long, tattered trench coat shuffles down a rain-slicked city street at midnight. Their head is bowed low. The neon signs from dive bars reflect in the dirty puddles on the cracked pavement."
See the difference? That level of descriptive detail is non-negotiable. The AI only knows what you tell it.
Pro Tip: Break your script down into a shot list. For every single shot, describe the subject, the action they're performing, the environment, the lighting, and even the camera angle. This makes it a breeze to turn your script directly into prompts later.
Create a Visual Storyboard with AI
With your script ready, it’s time to build a visual roadmap. Storyboarding is how you lock in the look and feel of your video, ensuring consistency from one scene to the next. It also lets you play with the pacing before you commit to the time-intensive process of generating video. The best part? You no longer need to be an artist to do it.
Just use an AI image generator, like the one built into Auralume AI, to bring your script to life one frame at a time. This is a game-changing step for a few reasons:
- Lock in Your Look: Generate keyframes for each scene to establish your character's design, the color palette, and the overall vibe. No more random style changes mid-video.
- Test Your Shots: Quickly experiment with different camera angles. See what a "dramatic low-angle shot" actually looks like compared to a "drone shot from above" and choose what serves the story best.
- Catch Problems Early: Seeing a static image of your scene often highlights what’s working and what isn’t. It’s the perfect time to tweak your script or prompts before you've invested hours generating motion.
This AI-assisted storyboarding process is your secret weapon. It closes the gap between the idea in your head and the final product, making the whole journey smoother and far more predictable.
Mastering the Art of AI Video Prompts
In the world of AI video, your prompt is everything. It's your director's chair, your camera lens, and your lighting kit all rolled into one powerful string of text. Honestly, getting good at this is the single most important thing you can do to go from generating random, weird clips to creating intentional, cinematic scenes. This is where you tell the AI not just what to create, but how to create it.
Think of a basic prompt like giving a vague suggestion to an actor. "A man walks" will get you a result, sure, but it will probably be generic and lifeless. A well-engineered prompt, on the other hand, is like giving detailed, frame-by-frame direction to a world-class cinematographer. You’re controlling every element, leaving nothing to chance.
Deconstructing the Perfect AI Video Prompt
A powerful prompt isn't just a long sentence; it's a carefully layered set of instructions. When I'm building a prompt, I always think about a few core components to make sure I cover all the bases and give the AI a rich, detailed scene to work with.
A great formula to start with involves four key elements:
- Subject: Who or what is the focus? Get specific. "A woman" is weak. "A weary female astronaut in a scuffed, white EVA suit" is strong.
- Action: What is the subject doing? The more vivid your verbs, the better. "Sits" is just okay. "Slumps into a rusted metal chair, her helmet clutched in her lap" is far more compelling.
- Environment: Where is this all happening? Paint a picture with your words. "In a room" is useless. "Inside the dimly lit, cramped cockpit of a derelict starship, warning lights flickering on the console" immediately sets a powerful mood.
- Style: This is your artistic direction. It covers lighting, color, camera work, and the overall vibe. This is where you inject the cinematic magic.
By layering these components, you build a prompt that is dense with information, guiding the AI toward the exact look and feel you're imagining.
From Basic to Cinematic: A Real-World Example
Let's put this into practice. Imagine you're creating a short ad for a new coffee brand with a rugged, adventurous theme.
Your first thought might be a simple prompt: A man drinking coffee in the mountains.
That will give you something, but it's going to look like a generic stock clip. Now, let's apply our formula to kick it up a notch.
- Subject: A rugged man in his late 30s with a short beard, wearing a worn flannel jacket.
- Action: He slowly raises a steaming, enamel mug of black coffee to his lips, a look of peaceful contemplation on his face.
- Environment: He is sitting on a rocky outcrop at sunrise, overlooking a vast, misty mountain valley. The first rays of golden sun are breaking through the clouds.
- Style: Cinematic, dramatic lighting, slow-motion, shallow depth of field, 8K, photorealistic, shot on an Arri Alexa camera with an anamorphic lens.
Combining all that gives us a much more powerful prompt:
Cinematic slow-motion shot of a rugged man in his late 30s with a short beard, wearing a worn flannel jacket. He slowly raises a steaming, enamel mug of black coffee to his lips, a look of peaceful contemplation on his face. He is sitting on a rocky outcrop at sunrise, overlooking a vast, misty mountain valley as the first rays of golden sun break through the clouds. Dramatic golden hour lighting, shallow depth of field, 8K, photorealistic, shot on Arri Alexa with an anamorphic lens.
See the difference? This level of detail is how you get professional results. You've told the AI everything it needs to know, from the character's appearance right down to the specific camera technology you want to emulate.
Choosing the Right AI Model for the Job
Not all AI video models are created equal. Different models have their own quirks and excel at different styles. Platforms like Auralume AI are great because they often bring several top-tier options under one roof, letting you pick the best tool for each specific shot. Knowing their strengths is key to a smooth workflow.
Before you start generating, think about what you actually need the final clip to look like. The table below breaks down some common model types and their ideal use cases.
AI Video Model Strengths Comparison
| AI Model | Primary Strength | Best For | Example Prompt Cue |
|---|---|---|---|
| Model A (e.g., Sora-like) | Photorealism & Physics | Creating lifelike scenes with complex character interactions and accurate environmental physics. | "A golden retriever chasing a red ball across a wet lawn, realistic water splashes" |
| Model B (e.g., Google Veo-like) | Cinematic Quality & Consistency | Achieving a consistent aesthetic across multiple clips, ideal for narrative storytelling. | "cinematic shot, consistent character design, dramatic lighting, high fantasy style" |
| Model C (e.g., Pika-like) | Stylized Animation & Effects | Generating unique, non-photorealistic styles like anime, claymation, or abstract visuals. | "whimsical watercolor animation of a cat flying through a starry night sky" |
| Model D (e.g., Kling-like) | Motion Control & Dynamics | Creating videos with specific and complex camera movements, like fast-paced action sequences. | "dynamic drone shot following a car racing through a winding coastal road, fast motion" |
Choosing the right model from the get-go means you'll spend less time fighting with prompts and more time refining your vision. For our coffee ad example, a model known for photorealism and cinematic quality would be the obvious choice.
Using a Prompt Wizard for Pro-Level Results
Even with a solid formula, crafting the perfect prompt can be a bit of an art. It takes practice. This is where specialized tools come in handy. Auralume AI includes a Prompt Wizard that's designed to auto-optimize your ideas and basically coach you toward better results. It’s a huge help, whether you're just starting or you've been doing this for a while.
For instance, you might plug in your basic ideas for the subject, action, and style. The tool can then help sharpen your language, suggest more powerful descriptive words, and format it all into a prompt that the AI will understand perfectly.
This screenshot shows how it breaks down the complex process of prompt engineering into simple, manageable fields.
Instead of just guessing which keywords will work, a tool like this guides you, making sure crucial elements like camera angles, lens types, and lighting styles are included for maximum impact. It really helps flatten that steep learning curve and lets you start creating high-quality clips almost immediately.
From Generation to Refinement
Alright, you've got your blueprint and a pocket full of well-crafted prompts. Now comes the fun part: bringing your vision to life. This is where the real work begins—a creative back-and-forth between you and the AI. You'll generate your first clips, see what the machine spits out, and then fine-tune your approach until the output clicks with the scene in your head.
Let's be real: your initial generations will rarely be perfect. Think of them as the first take on a movie set. They're a starting point, not the final product. Don't get discouraged if a clip looks a little wonky at first. The goal is to analyze what worked, what didn't, and then refine your prompts with almost surgical precision.
The Iteration Loop: Producing and Polishing
Refining an AI video is all about the feedback loop. You prompt, you generate, you analyze, you repeat. Did the AI completely misinterpret an action? Was the lighting way too harsh? Does the character’s face look... weird? Every little imperfection is a clue for your next prompt.
For instance, say you prompted for a "serene forest" but got a dark, spooky woods instead. Your next attempt needs to be more specific. You could add phrases like "bright morning light," "sunbeams filtering through the canopy," or "vibrant green moss" to nudge the AI toward the right mood. This constant refinement is what separates a novice from a pro.
This chart breaks down how to think about building a powerful prompt, starting with the basics and layering on the details.
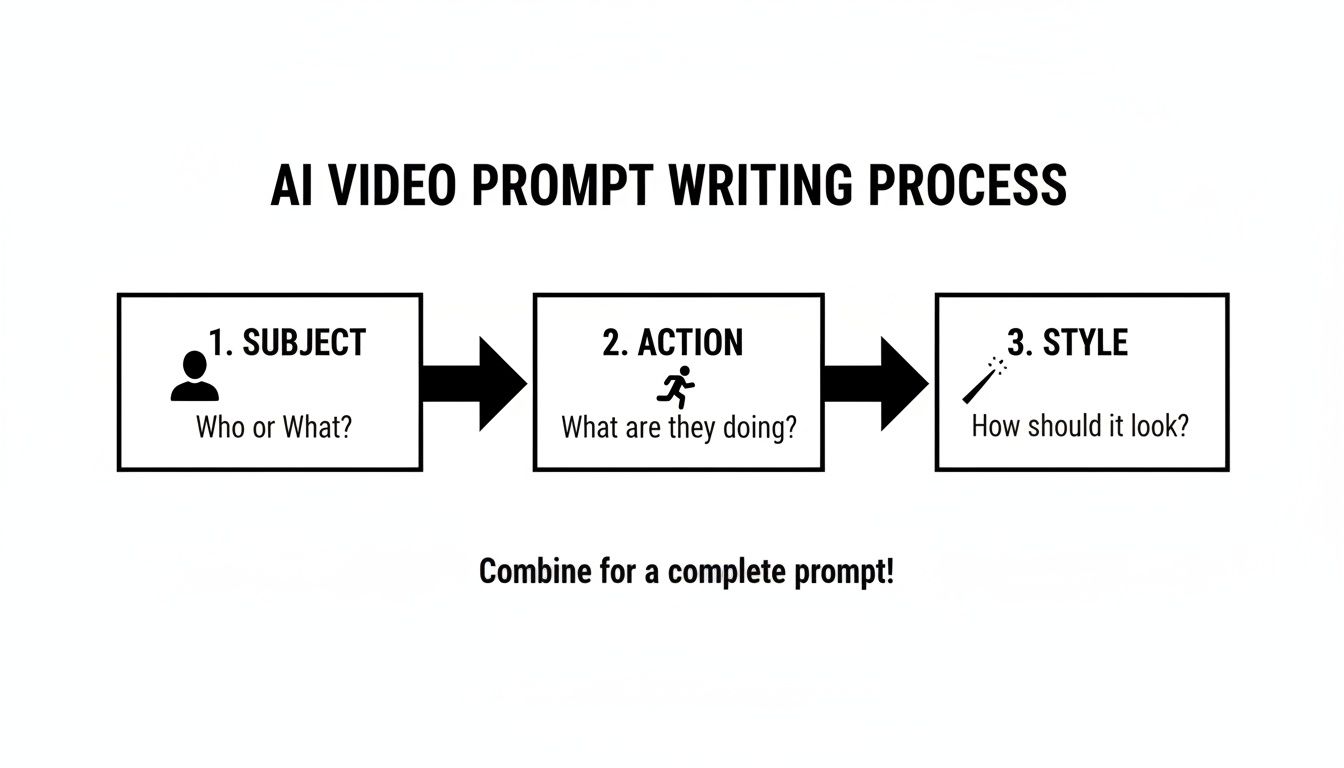
As you can see, layering these elements—the subject, the action, and the style—gives the AI a much clearer set of instructions to follow.
Creators are catching on fast. A staggering 63% of video marketers are now using AI, and they're slashing production costs by an average of 58% compared to old-school methods. As you move from your first generations to polishing the final product, looking at how professionals handle AI-powered TV commercial production can offer some fantastic shortcuts.
Maintaining Visual Consistency Across Shots
One of the biggest headaches with AI video is keeping everything looking consistent from one clip to the next. It’s incredibly common for a character's face to shift slightly or for the color palette of a room to change between shots.
Here are a few tricks I use to lock things down:
- Use Seed Numbers: Many AI platforms let you use a "seed" number, which is essentially a fixed starting point for the random generation process. By reusing the same seed for similar prompts, you can get much more consistent results.
- Reference Previous Frames: When you're ready to generate the next shot in a sequence, feed the AI a frame from the previous clip as an image prompt. This gives it a direct visual anchor to match.
- "Lock" Key Elements: Be absolutely relentless about repeating key details in your prompts. If your character is wearing a red jacket and has black hair, mention that in every single prompt for that scene.
Key Insight: Consistency isn't just about what your character looks like. It's about maintaining the same lighting, camera angles, and color grading to trick the viewer into believing every clip was shot at the same time and place.
Unlocking Control with Image-to-Motion
For an even greater degree of control, image-to-motion features are a total game-changer. Instead of just using text, you can upload a reference image to guide the AI. This is a brilliant way to create subtle, controlled animations.
Imagine you've already generated the perfect still image of your main character. You can upload that picture and prompt the AI to add tiny movements, like "subtle breathing, eyes slowly blinking, steam rising from the coffee cup." This technique is essential for bridging the gap between a static storyboard and a living, breathing video.
Finally, once you've got a collection of clips you're happy with, there's one last step before editing: upping the resolution. Most AI tools generate clips at a lower resolution to work faster. Using a dedicated AI upscaler is non-negotiable. It intelligently enhances your clips to a crisp 1080p or even 4K, turning your raw footage into high-definition assets ready for the final cut.
Assembling and Polishing Your Final Cut

You’ve got a folder full of incredible AI clips, which is a great start. But the real magic happens in the edit. This is where you stitch those individual shots into a cohesive story that actually makes people feel something. Post-production is what elevates a cool tech demo into a polished, professional video.
Let's be clear: this phase is less about generating new content and more about curation, pacing, and hitting the right emotional notes. Thinking about AI integration in post-production from the beginning can make this whole process a lot smoother.
Crafting a Cohesive Sequence
Your first job in the editing suite is to lay out your clips in a way that tells a story. Don't just drag and drop them onto the timeline in the order they were created. Think like a filmmaker. Even a short 15-second video needs a beginning, a middle, and an end to feel satisfying.
I always start by placing my "hero" shots—the most visually stunning or narratively critical clips. Once those anchors are in place, I use the other clips to build transitions, add context, and control the rhythm of the piece. You're trying to create a flow that pulls the viewer along without them even noticing.
The Power of Sound Design and Music
Honestly, visuals are only half the battle. Sound is what injects life and emotion into your AI-generated world. Never, ever underestimate how a great soundtrack or the right sound effect can completely transform a scene.
- Music: A good score sets the entire emotional tone. An upbeat track makes a product montage feel exciting, while a quiet piano piece can give a simple landscape shot a sense of weight and meaning.
- Sound Effects (SFX): Adding subtle, ambient sounds makes your world feel real. The rustle of leaves, the distant hum of traffic, the clink of a mug—these tiny details make an otherwise sterile AI clip feel immersive and grounded.
- Voiceover: If you’re telling a specific story, a clean voiceover is your guide. It provides clarity and direction, leading the audience exactly where you want them to go.
Pro Tip: Spend real time on your audio mix. Make sure the music isn’t drowning out your sound effects or voiceover. A balanced audio mix is a dead giveaway of professional work, especially when you’re building a video from scratch with AI.
Unifying Your Look with Color Grading
Even with super-consistent prompts, your AI clips will likely have small variations in color and light. Color grading is how you fix that, unifying every shot to create a single, cinematic look. This isn't just about correction; it's a powerful creative tool.
Applying a consistent color grade or a LUT (Look-Up Table) makes every clip feel like it belongs in the same universe. You can go for a warm, golden-hour vibe for a romantic piece or a cool, desaturated blue tone for something more sci-fi. This step is what turns a collection of clips into a cohesive film.
Optimizing Export Settings for Every Platform
After all that work, the final step—exporting—is just as crucial. Different platforms have their own technical quirks, and optimizing your export settings ensures your video looks sharp everywhere it’s seen.
This is especially important now, as demand for short-form content is through the roof. The social media segment of AI video generation is projected to grow at a CAGR of 23.5%, largely because platforms like TikTok and Instagram are hungry for tailored content.
Here’s a quick cheat sheet for common export settings:
| Platform | Recommended Resolution | Aspect Ratio | Bitrate (Mbps) |
|---|---|---|---|
| YouTube | 1080p or 4K | 16:9 | 8-15 (1080p), 35-68 (4K) |
| Instagram Reels/TikTok | 1080p | 9:16 | 10-15 |
| Instagram Feed | 1080p | 1:1 or 4:5 | 10-12 |
Master these post-production skills, and you’ll be able to turn your AI generations into polished, compelling videos that can captivate an audience anywhere.
Got Questions About Making Videos with AI? We've Got Answers.
Jumping into AI video creation for the first time is exciting, but it definitely comes with its fair share of questions. As this tech keeps growing, pretty much every creator runs into the same handful of challenges and "what ifs."
This section is all about tackling those common questions head-on. No fluff, just straight answers to help you feel confident and ready to create.
How Do I Keep My Characters Looking the Same from Scene to Scene?
This is the big one. It’s probably the most common frustration I hear about. You spend ages getting a character just right in one shot, and in the next, they look like a completely different person.
The trick is to give the AI a rock-solid, consistent reference point. Don't leave it to chance. You have to be incredibly deliberate.
Here's what I do:
- Start with a "Seed" Image: Before you even think about video, use an AI image generator to create one perfect still image of your character. This is your visual anchor, your "master" file.
- Use Image-to-Video Features: When you go to generate your video clips, always upload that seed image alongside your text prompt. You’re essentially telling the AI, "Okay, now make this person do the action I'm describing."
- Drill Down on the Prompt Details: Be ruthlessly consistent with your descriptions. If your character is "a woman with fiery red hair in a high ponytail, wearing a black leather jacket with silver zippers, sharp green eyes," you need to use that exact phrase in every single prompt for that character.
My Go-To Workflow: I never start generating video clips until I have a master character portrait I love. For every new shot, I upload that portrait as an image reference and copy-paste my detailed character description into the prompt. It's a two-pronged approach that cuts down on those weird inconsistencies more than anything else.
Is This AI Video Stuff Going to Be Expensive?
The cost can swing pretty widely, but let's put it in perspective: it's almost always a tiny fraction of what traditional video production costs. You're not renting gear, hiring actors, or scouting locations. Your main cost is the subscription or credits for the AI platform itself.
Most platforms, including Auralume AI, run on a credit system. You buy a pack of credits, and every video you generate uses some of them up. What affects the cost? Usually, it's things like:
- Video Length: A 3-second clip will cost less than a 10-second one. Simple as that.
- Resolution: Pushing out a 4K video is going to burn more credits than a standard 720p clip.
- Prompt Complexity: Sometimes, a really detailed or complex request needs more computing power, which can nudge the credit cost up.
What's great is that you can dip your toes in without a huge financial commitment. Most services have a small, pay-as-you-go option to let you experiment. For the vast majority of creators, the cost is miles below what you'd spend on even a single good lens for a camera.
What's the Deal with the Legal and Ethical Side of This?
This is a conversation every AI creator needs to have. The rules are still being written, but a few key principles will keep you on the right side of things.
First up, copyright. This is a tricky one. In many places, something generated purely by a machine can't be copyrighted like a piece of human art. But the way you creatively combine, edit, and arrange those AI clips into a final, unique video? That's your work, and it's typically protectable under your own copyright.
Next, just be smart. Don't try to generate videos of real people without their permission, and stay away from obvious intellectual property. Instead of prompting for "Iron Man flying over New York," try something original like "a futuristic knight in red and gold powered armor soaring between skyscrapers." Make it your own.
Finally, a little transparency goes a long way. If your video is entirely AI-generated, especially if it looks realistic, think about adding a quick disclosure. It builds trust with your audience and is just good practice. And always, always read the terms of service for whatever platform you're using—they'll tell you exactly what you can and can't do, especially for commercial projects.
Ready to stop wondering and start creating? Auralume AI brings the industry's best AI video models together in one simple platform, complete with a Prompt Wizard to guide you. Turn your ideas into cinematic videos today at Auralume AI.